- Home
- Airtightness
Airtightness to Reduce Your Energy Use
Improving the airtightness of your home can make a huge difference to the amount of energy used to heat it in the winter.
Even if your home is well insulated, poor airtightness will reduce the efficiency of that insulation. This happens by a process called ‘wind wash’ (where the wind or draughts blow across and, to an extent, through the insulation, drawing the heat out of it).
Your heating system then has to fire up more often to replace that lost heat, costing you more money and pumping pollutants into the atmosphere.
Imagine going out in a cold day in a thick wool sweater. Wool's a great insulator, so you’ll be nice and warm, right?
Well, yes, provided it not windy, on a windy day the wind blows straight through the wool sweater making you cold.
Now imagine pulling a windproof rain coat over the wool sweater.
Just by stopping the wind wash you’re instantly a lot warmer.
The same applies to your home. Just by putting a ‘jacket’ over your insulation you’ll allow it to perform a lot better. So when you’re carrying out your eco-home renovation and installing or upgrading insulation, it’s really important to improve the airtightness of your home.
However you MUST maintain the breathability of the structure without allowing too much water vapour to get into your insulation.
This is achieved by installing a vapour control layer (VCL) on the warm side of the insulation, using natural insulation (that can easily absorb and release water vapour without affecting its insulation properties and finally wrapping the outside of the insulation in a breather layer to reduce wind wash.
It is important that all joints and edges of these barriers are taped with good quality tapes (not duct tape or the like (there are specific tapes for specific jobs). This article on installing underfloor insulation will make it easier to understand which goes where.
The net result of this is to allow your insulation to keep the heat out during the summer and keep it in during the winter.
Even if you’re not upgrading or adding insulation it still makes sense to make your home as airtight as possible WHILE MAINTAINING CONTROLLED VENTILATION.
Vapour Control in Older Buildings
- What is a Vapour Control Layer (VCL) - Understanding what a VCL is and where it needs to be placed to be effective is very important when you're upgrading an older home and will make alls the difference to your end results, when installed correctly.
- What is the Difference between a vapour control layer and vapour barrier? - understanding the difference is essential as one will create issues and should not be used in older properties and the other will allow your home to become airtight while retaining its breathability.
- Can You Use Staples to Install Your VCL?- Yes, but there are are some downsides, so check out my article to see it you want to use this method or not.
- Breather Membrane - as mentioned above the purpose of this is to reduce wind wash and help the insulation to maintain its heat.
- Tapes - tapes come in a variety of types and sizes and as you might imagine its purpose is to join membranes to different building surfaces, stick membranes to themselves at overlaps and seal around services etc.
It's Not all About Barriers!
Airtightness isn't just about vapour control layers, breather membranes and tapes.
There are other things that you can do now to help improve the airtightness of your home and help reduce your energy bills.
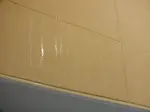
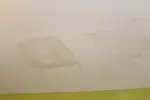
Thermal Images of Poor Airtightness in Homes:
The images below show some typical areas around houses where poor airtightness can create cold spots and draughts. Yet these can be easily sealed or insulated to make a big difference to the comfort of your home.


Common Air Leakage Routes:
- Letterboxes - if you have a draught around your letterbox fit a good quality flap with a strong spring to the outside and a second flap or brush bar to the inside.
- Keyholes - you might be surprised by the amount of draught that comes through keyholes (even the Yale type). For open keyholes simply fit a flap that swings from side to side over the outside and a second cover or brush type draught excluder inside. For Yale type locks you can buy plastic covers (but if you use the door a lot these are a pain as you have to pull them off to use the key in the lock, so they’re best used on doors that don’t get opened a lot such as conservatory doors).
- Cat flaps - ideally choose a draught free and insulated cat flap, they will be more expensive but will make a big difference.
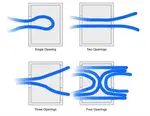
- Exterior Door frames and doors - airtightness around doors tends to be a weak point and yet they‘re fairly straight forward to draught proof. There are different types of draught strips available but they need to be fitted correctly (see diagram below).
The top and sides of the door can be sealed with various types of draught strips available from your local hardware store and a draught under the bottom of the door can be sealed with a brush strip, wiper strip, a compression strip or a self levelling strip. Where the door frame meets the wall will need to be sealed with a good quality sealant (cheap silicone tends to shrink over time and will pull away from one surface opening the gap again). It’s also a good idea to seal the joint between the doorframe and wall on the inside too. - Floor boards on suspended timber floors - these can be relatively easily sealed when upgrading insulation or if you just want to reduce the draughts you can cut cork into strips, unravel old lengths of rope (Jute fibres) etc. and push them between the floor boards. Alternatively if you don’t mind using plastic, you can buy strips of plastic for this very purpose, they’re folded to form a ‘V’ and pushed into the gaps.
- Around skirting boards - as above strips of cork, Jute or hemp can be used to seal the gaps below skirting boards.
- Attic Hatches - to improve the airtightness, fit a compression seal around the edge of the hatch and ideally some form of latch to stop gusts within theft area (from loft ventilation) lifting the hatch.
The top side of the hatch should have insulation installed. I find a solid foam insulation is easier to form a good shape and it can be stuck to the top of the hatch. If you use loose wool type insulation it tends to move about every time the hatch is opened and before long it will fall off. I added sides to my hatch to ensure a snug fit for the insulation and it stops the insulation getting damaged.


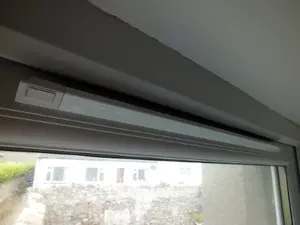
- The junction between window frames and the walls - if you have any gaps around the edges of your windows, between the frame and wall (also check below the window sill as I see gaps here all the time. These gaps can be sealed with a good quality sealant.


- Poorly fitting window openers - If your window openers don’t close tightly you can have them adjusted so that they form a tight fit when closed. There are lots of companies who will adjust and repair your existing PVC frames. Sash windows are more difficult to draught proof but a compression seal to the bottom of the openers is usually a good starting point. There are also different sizes of brush seals available for the sides.
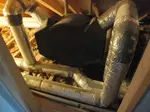
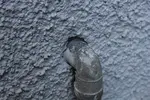
- Poor airtightness where services pass through external walls, ground floors and top floor ceilings - these areas can be more difficult to access as you’ll likely have to move baths, lift flooring etc to get to them. When pipes and wires etc. pass through these areas there is typically a gap left which will allow draughts to get in.
Large holes in walls can be filled with cement, gaps around floors and ceilings can be stuffed with loose insulation and the ideally they should have a DIY vapour barrier fitted (I haven’t been able to find any pre-formed vapour barriers for this purpose but you should be able to create one with a sheet of vapour barrier cut and taped to form the desired shape and then taped to the existing vapour barrier in the floor, wall or ceiling etc. - External walls - you should make sure there are no holes or cracks on the outer surface where a draught could get in. Check mortar joints, around service pipes, window, door openings and where extensions join an existing wall etc. Any caps should be cemented where appropriate or filled.
- Light fittings - ceiling light fittings and pull switches etc all pass through ceilings leaving holes for draughts so these should be sealed by either fitting airtight light fittings, an airtight box above the ceiling or fitting a ‘fire hood’ for recessed light fittings which also form good vapour barriers if fitted correctly or make up your own vapour barrier as previously mentioned.
How can I find check the airtightness of my home?
You can assume that your home is pretty leaky when it comes to draughts, and the older it is the worse it’s likely to be.
You can check the airtightness by looking for air leaks using something like an incense stick - Choose a day, when it’s windy outside or when there is a big temperature difference between inside and outside. That way the draughts should be at their maximum. Light the incense stick and then blow it out so that it starts to smoke continually. Then just go round your home at all the points mentioned above and watch the smoke, you’ll see straight away if there’s a leak. I find that sticking up post-it notes where I find a draught, helps remind me where all the draughts are, so that I can go back later and seal them.
A more comprehensive method would be to employ one of the many companies out there who can check the airtightness of your home by sealing up all the openings (windows, chimneys and doors etc.) and the controlled ventilation (trickle vents, extractor fans etc.) and then installing a large fan in the doorway which is used to push air into the property creating a positive pressure inside the house of 50 Pascals. Depending on how hard the fan has to work in order to maintain that constant air pressure of 50 Pascals allows them to calculate how airtight your property is.
These companies will usually give the result in m³/(m²·h) @50 Pa (known as the air permeability rate) Some will also give you the ACH (air changes per hour) figure.
To give you a guide the UK average according to the BRE (Building Research Establishment) is 11.5 m³/(m²·h) @50 Pa. Savings of around 15% of the space conditioning energy can be achieved by reducing this figure from 11.5 m³/(m²·h) @50 Pa (average current value) down to 5 m³/(m²·h) @50 Pa (achievable).
Ref: (D. Butler and A. Perry, "Co-heating Tests on BRE Test Houses Before and After Remedial Air Sealing," Building Research Establishment. AND Coxon, “Research into the effect of improving airtightness in a typical UK dwelling,” The REHVA European HVAC Journal-Special issue on airtightness, vol. 50, no. 1, pp. 24-27, 2013).
These figures are then converted into air changes per hour. Typically non-refurbished homes in the UK have a ACH of 2 or more but this figure can be much higher. New properties can be less than 1 and very airtight homes can be less than 0.6.
In conclusion the airtightness of your home makes a significant difference to the size of your bills and the effectiveness of your insulation. While it can be difficult to create a truly airtight house without carrying out a full renovation the airtightness can be improved in stages as you do each room, it's pretty easy to do and it will make a difference.
You might also like the following articles, or click here for the full site index.
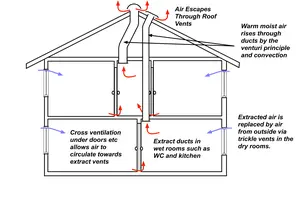
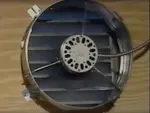
Why Bathroom Extractor Fans Don’t Work
Bathroom Extractor fans are NOT all equal! Is yours doing very little to stop condensation and mould in your home?
The Benefits of Home Ventilation
The benefits of home ventilation, once understood can make a huge difference to your health and the health of you and your home.
Why Loft Ventilation is so Important?
Why is Loft Ventilation so important in homes today. If you have condensation issues in your loft or you’ve added additional insulation. You need to read this!
Whole House Ventilation Explained
Whole house ventilation is essential in order to avoid condensation problems. But do you really understand it and how the best ventilation systems work to improve the air quality in your house.
Passive Stack Ventilation Explained
So what is passive stack ventilation, what are the advantages and disadvantages and should I install it in my home?
Home Ventilation Systems and Why You Need Them
The best home ventilation systems will make you home healthier and easier to heat, but you need to know how they work and what the pros and cons are if you’re to pick the right one.
A Draught Definition for Home Owners
Understanding the draught definition for homeowners is important to understand as there are different types of draughts, some you want and others you don’t.
Positive Pressure Ventilation in Your Home
Can positive pressure ventilation improve the air quality and reduce condensation? Get all the answers here including the advantages and disadvantages.
Attic Ventilation fans Explained
Attic Ventilation fans - Find out why you'd want to fit them, their advantages and disadvantages and the different types available.


Recent Articles
-
Air Source Heat Pump Efficiency
Oct 16, 24 08:33 AM
 Understanding air source heat pump efficiency is essential if you want a system that is cheap to run, these pointers should help you create an efficient system.
 -
How to Increase Your EPC Rating
Apr 24, 24 11:33 AM
 Learning how to increase your EPC rating is simpler and probably less expensive than you think- find out how here.

