- Home
- Energy Efficient Upgrades for Existing Houses
- Insulating an Attic Room
Insulating an Attic Room
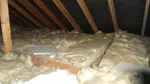
When it comes to insulating an attic room, you’ll probably be thinking of this for one of two reasons. Either you have a house with an existing room in the roof OR you are thinking about creating a room in the roof of your home.
If you’re thinking about creating a new room your builder will have to adhere to the current Building Regulation requirements and you should get a fairly well insulated roof (assuming their attention to detail is good). However the standard method of insulating an attic room does have a few downsides, but more about that in a minute.
If you have a house with an existing loft room and you just want to find out how to insulate the existing room, then you’re in the right place. Perhaps there’s currently no insulation between the existing room’s walls and the crawl space, or the ceiling and the roof OR the existing insulation is just poor.

Why Insulate your Attic Room?
Simply because heat rises and an uninsulated, or a poorly insulated attic room will lose heat rapidly. Which will mean high heating bills for you.
The Existing Method of Insulating an attic room:
Traditionally what happens when insulating an attic room is the vertical wall sections of the attic room (assuming you have an eaves access area or crawl space) will have either PIR board (the rigid foil backed insulation boards) or fibreglass wool placed between the timbers of the stud wall.
The ceiling section would also typically have PIR board or fibreglass wool etc. placed between the ceiling rafters.

So what’s wrong with this method?
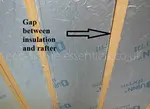
- PIR board is really difficult to fit tightly between the rafters (as iare fibreglass, mineral fibre wools etc.) and if it’s not tight, heat will just escape through the gaps.
- VOC's - man made insulation tends to be made of fairly nasty chemicals and these materials usually emit Volatile Organic Compounds at room temperature and they are pretty nasty. They’re linked with many diseases such as asthma, sick building syndrome and chemical sensitivity etc. So they’re best avoided where possible.
- The wool type insulation, if used, is typically held in place with chicken wire or strawberry netting to try to stop it falling out of place and long term the insulation will have a tendency to slump and open gaps for the heat to escape through.
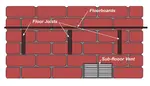
- If insulating the sloping ceiling section it is really important to leave a 50mm air gap between the top of the insulation (the outside face) and the underside of the roof cover (or more likely, the sarking felt or roofing membrane which is fitted to provide a waterproof barrier under the roof tiles/slates etc.).
This air gap is provided to allow water vapour to be taken away by the movement of air over the insulation and needs ventilation at the eaves and at the ridge to allow the air to keep moving and remove water vapour. If you don’t have adequate ventilation you risk condensation which can lead to mould, damp and worst case scenario rot to the roof timbers. In my experience this air gaps is rarely there. - Wind wash - I’ve covered this elsewhere but briefly this is where the air moving over the surface of the insulation (as per the ventilation gap mentioned in 3. above) causes heat to be drawn out of the insulation which means the insulation performs below what it is capable of. To prevent this you would use a vapour permeable membrane on the cold side of the insulation (the top of the insulation).
- Traditionally insulation installation companies do not use vapour control layers or vapour permeable breather membrane layers and these, in my opinion, are essential to allowing the insulation in your attic room to function to the best of its ability.
Some will argue that the traditional method of insulating an attic room is better than not having any insulation, but it can cause issues with interstitial condensation, which can also lead to rot and we can do so much better. Depending on your preference for using chemical based insulation materials (the traditional products) or the eco-friendly insulation materials the method of installing them the right way is actually pretty similar).

Different Insulation Types For Insulating an Attic:
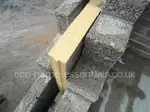
- Traditional types of attic room insulation materials - There are numerous types of traditional insulation that are traditionally used when insulating an attic room but the most common types used would be PIR (Polyisocyanurate) boards, fibreglass wool, mineral fibre and Polystyrene sheets, to name but a few.
- Eco-Friendly, natural insulation materials - These contain much less toxins and VOCs (Volatile organic Compounds) and examples include wood fibre, Jute (made from recycled cocoa and coffee bean bags), sheep’s wool (try to choose sheep’s wool that’s been treated to prevent moths and other insects eating it) etc.

So what’s the main differences between the traditional man made insulations and the natural ones?
The two big differences are:
- The man made insulation materials are mostly hydrophobic (don’t absorb and release water vapour readily. Whereas the natural insulation materials are hygroscopic - meaning they DO absorb and release water vapour readily.
Why is this relevant?
Hygroscopic insulation will take in water vapour during periods of high humidity and release it during periods of low humidity. Examples include; sheep’s wool, wood fibre or Jute insulation etc. and this will help to manage the humidity levels within in your property. - As touched on above the manmade insulation materials contain chemicals and VOC’s
You’ll also need to consider the vapour control layer and vapour permeable membrane layer required to increase the efficiency of the insulation material that you choose by reducing the risk of interstitial condensation within the insulation and reducing “wind wash”.
Vapour Barriers (VBs), Vapour Control Layers (VCLs) and Airtightness Layers:
- Vapour Barriers -Vapour barriers are traditionally Polythene sheets that were added to the warm side of the insulation (the room side of the insulation in the UK) to prevent moisture and water vapour getting into the insulation where it can condense and cause interstitial condensation (condensation inside the insulation).
We now know that hey can cause pretty serious problems as they can stop any water vapour that is already within the structure, or, as water vapour moves inward during the summer months and this can trap moisture against the timber elements of the structure and cause these to rot. - Vapour Control Layers - are semi-permeable sheets which allow small amounts of water vapour through so that the natural hydrophobic insulation can absorb and release water vapour depending on the conditions. You can also get intelligent vapour control layers that open and close the holes within it depending on the conditions at any given time.
- Breather Membrane- this a membrane with a vapour resistance of less than 0.6 MNs/g. They are typically installed on the cold side of the insulation and acts as a weatherproof layer whilst still allowing water vapour to be passed to the outside and they will reduce the effect of wind wash.
So whether you’re using natural hygroscopic insulation or manmade insulation you should always use a VCL on the warm side of the insulation and a vapour permeable breather membrane on the cold side.
Finally all these layers will need to be sealed at their edges with a good quality tape (after all the seal has to last as long as the house) and I mean proper tape designed for the job, not gaffer tape or parcel tape.
Insulating an Attic in Steps:
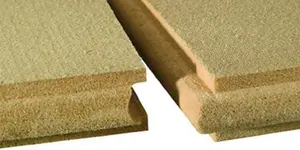
My personal choice of insulation material is wood fibre as it’s ideal for the insulation lofts, it can be compressed slightly to fit between the rafters before expanding again to form a tight fit and it doesn’t contain any nasty chemicals.
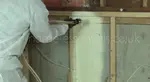
- Clear the attic room as much as possible so that all the rafters and vertical stud work etc is visible.
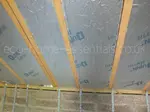
- Install the vapour permeable breather membrane layer between the rafters by forming pockets into which you will be pushing your insulation (don’t forget to allow the 50mm air gap). To make sure you have a good 50mm gap it can be a good ideal to use 50mm battens nailed to the edges of the rafters as a guide.
That way you won’t inadvertently push the insulation too far up into the gap between the rafters. Tape all edges (where it meets the wall plate, walls etc.) and joints. It’s a good idea to use as big a sheet was possible as this will minimise the number of joints that you have to seal. - Install the insulation making sure to have it as tightly packed as possible, so no gaps between the edges of the rafters and the insulation.
- Install the vapour control layer on the warm side of the insulation (i.e. to the inside face of the insulation) and tape all edges and joints as above.
- Fit counter battens and plasterboard and you’re done.
Areas to Watch When Insulating an Attic:
The most difficult things to achieve is typically getting the taping at the bottom of the rafters/wall plate done well as you don’t want any gaps and it is a small, tight area to work in, but a little persistence will pay dividends in the future.
If you’re replacing the roof cover, this will give you the option to add insulation above the rafters as well as between them without losing space internally.
If you have the room you could also add an additional layer of insulation below the level of the rafters.
Don’t forget your need a vapour control layer (which goes on the warm side of the insulation) and NOT a vapour barrier.
Things You Will Need When Insulating an Attic:
The links below will take you to a partner site where you can buy the various products you'll need. These contain affiliate links for which I may make a small commission at no extra cost to you, should you make a purchase. Any commission made allows us to keep this site free for everyone to use.
Materials You May Need to Do This:

An Underfloor Insulation "Kit"
Passive House Systems have worked with us to put together an "Underfloor Insulation Kit", (this can also be used for fitting loft insulation), which includes the most common items you'll need to do the job correctly. They give you the sizes of each item, so you can figure out how much you'll need. Then it's as simple as clicking the number of each item you want. Plus it's all on one page so you don't have to hunt around their site to find everything.
Plus buying it this way will save you 10%.
The kit includes:
- A Vapour Control Layer (VCL) - installed on the warm side of the insulation
- A breather membrane - installed on the cold side of the insulation.
- Tape - to stick and join the vapour control layer (used for internal taping, so, jointing of vapour control layers, covering staples and sealing around services etc).

Your choice of natural insulation.
Other Materials You Might Need:

Tape to stick and join the breather layer (used for covering staples and sealing around services etc. that go through the breather layer. As this layer is located on the cold side of the insulation this is a waterproof tape).

1. Adhesive to stick either the VCL or the breather membrane to masonry walls - where the VCL or breather layer meets a masonry wall this is used, if you don't need to plaster over the finished joint, (it should be used in conjunction with a primer, see below).

1a. If however you want to plaster over the joint between the breather layer OR the VCL and a masonry wall, then you would use this tape - (it should be used in conjunction with a primer, see below).

NB. prior to sticking the VCL or the breather membrane to a masonry wall with either of the above two products you will need to use a spray on or paint on primer.
As with all insulation jobs within your home, when insulating an attic the attention to detail is where the savings are made in the long run. Use good quality tapes for sealing the edges of the VCL and breather membrane. Take your time and make sure there are no tears in any of the membranes and seal well around light fittings etc.
If you have gaps the heat and water vapour will find them!
You might also like the following articles, or click here for the full site index.
Blow in Insulation
Blow in insulation can make a big difference to your home, but be aware of the disadvantages as well as the advantages before making your final decision.
Cavity Wall Insulation Problems
Understanding cavity wall insulation problems is essential before you decide to retrofit cavity insulation.
The Best Insulation for Homes
Choosing the best insulation for homes means knowing the all the advantages and disadvantages of the many different types of insulation available.
Rigid Foam Insulation
What's the best rigid foam insulation for your job, which performs best? What are the most popular types? And find out which is the most cost effective.
Are DIY spray foam insulation kits a viable option?
Is DIY spray foam insulation really something you can install yourself? Find out what the advantages and disadvantages are before committing yourself.
The Different Types of Wall Insulation
Understanding the different types of wall insulation is essential if you're to choose the right one that won't damage your home.
Insulating Floors from Below
Is insulating floors from below feasible? The simple answer is yes, but as ever, there are some things you'll need to consider before starting.
Is Internal Wall Insulation Worth Installing?
Why install internal wall insulation? Discover the pros and cons and how it can improve the health of you and your home while saving you money.
Full Fill Cavity Insulation Advantages
Cavity insulation advantages are often overlooked due to bad press, but it's not all bad news: here are the facts
Exterior wall insulation - Is it Right for You?
Is exterior wall insulation right for your home? I list all the advantages and disadvantages of external insulation here.
How to Install Insulation in Your Attic
How to install insulation in your attic the right way. Turns out most of us install it incorrectly, which can cause condensation and mould.
Is Denim Insulation Any Good?
Is denim insulation is a good choice for your home? Here's everything you need to know before making your decision.
Wood Fibre Insulation - Advantages and Disadvantages
What is wood fibre insulation and what are the reasons to use it or not use it.
Insulating an Old House - The Right Way
Insulating an old house sounds easy but if done wrong you could cause damage to your home.
Best Home Insulation Materials!
Choosing the best home insulation is a bit of a minefield. So here's a list of the main products available with their R-values.
Sheep Wool Insulation Natures Wonder Material
Is sheep wool insulation a genuine wonder material for insulating homes? Here's everything you need to know.
Adding Underfloor Insulation, the why, how and what could go wrong.
Adding Underfloor Insulation is easy to do incorrectly, but thankfully just as easy to do right if you have the right information and the right materials.
How Insulation Works in Your Home.
Discover how insulation works in the walls and ceilings of your home. When you understand how it works you can choose the right insulation product!
Problems With Cavity Wall Insulation
Understanding the problems with cavity wall insulation is essential before you consider retrofitting cavity insulation.
Is Spray Foam Insulation Any Good?
Is spray foam insulation really that much better than traditional insulations and what are the advantages and disadvantages?
My top 5 best energy efficient home upgrades to reduce your bills
My best energy efficient home upgrades may surprise you. They're simple to implement and will reduce your bills straight away.


Recent Articles
-
Air Source Heat Pump Efficiency
Oct 16, 24 08:33 AM
 Understanding air source heat pump efficiency is essential if you want a system that is cheap to run, these pointers should help you create an efficient system.
 -
How to Increase Your EPC Rating
Apr 24, 24 11:33 AM
 Learning how to increase your EPC rating is simpler and probably less expensive than you think- find out how here.

